Friday, May 29, 2009

Wine of the Week


I picked this up last week when I found it on sale at the wine store.

This was a great, economic, wine that will work well with seafood or lighter appetizers. It would also be great just to sip on in the summer. Citrus was predominate in this wine, and it had a great crispness to it. It was just slightly on the dry side, but would undoubtedly appeal to many palates. All in all, a great wine for the money!

Thursday, May 28, 2009

Herb and Shallot Grilled Turkey Burgers


This burger was simply a combination of things I had on hand. It turned out to be very flavorful and was overall just a great turkey burger. The combination of the different herbs worked very well together and it was very easy to make... definitely a good one to give to your husband to grill! In addition, I added sharp cheddar to the top of the burgers for added flavor and because I just like cheese! Overall, this is a great weeknight burger!
Ingredients
1 lb. ground turkey breast
4-6 large leaves of fresh sage
1/2 - 1 tsp. dried or fresh rosemary
1/2 - 1 tsp. Herbs de Provence
1/2 large shallot, finely minced
1 -2 cloves garlic, minced
4 slices sharp cheddar (optional)
salt
pepper
Directions
Mix all ingredients (except cheese) together in a large bowl until thoroughly combined. Form into patties, and grill until completely cooked in the center, about 20 minutes. Add cheese and cook until melted and serve on fresh hamburger buns.

Wednesday, May 27, 2009

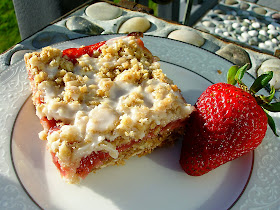
Strawberry Rhubarb Crumb Bars


At the farmer's market, I picked up some great looking Rhubarb to try for the first time. Yup, you heard me. I've never had rhubarb until last weekend! But I have always been really curious to try it, so I thought what better time than now! I've seen a lot of pie recipes, but I really wanted to make something that I could easily pass out at work. So I found these bars on the Land O'Lakes website and it looked like the perfect recipe!!!

These were SO good. I was very pleasantly surprised with how it tasted combined with the strawberries. I tried rhubarb raw at first, and was very much hoping it would taste much different when it was cooked, and thankfully it did!!! Additionally, the crumb crust and topping is fantastic. These went like hot-cakes at my office, and even people who said that the "didn't like rhubarb" were totally impressed with them. This was a great, easy dessert to make with rhubarb.

Ingredients
Source: Land O'Lakes

Filling
1 1/2
cups fresh or frozen unsweetened rhubarb, cut into 1-inch pieces
1 1/2
cups sliced fresh strawberries
1
tablespoon lemon juice
1/2
cup sugar
2
tablespoons cornstarch
Crust
1 1/2
cups all-purpose flour
1 1/2
cups uncooked quick-cooking oats
1
cup firmly packed brown sugar
3/4
cup LAND O LAKES® Butter, softened
1/2
teaspoon baking soda
1/4
teaspoon salt

Drizzle
3/4
cup powdered sugar
1 to 2
tablespoons milk

Directions
Combine rhubarb, strawberries and lemon juice in 2-quart saucepan. Cover; cook over medium heat, stirring occasionally, until fruit is tender (8 to 12 minutes).

Combine 1/2 cup sugar and cornstarch in small bowl. Stir into fruit mixture. Continue cooking, stirring constantly, until mixture comes to a boil (about 1 minute). Continue boiling until thickened (1 minute). Remove from heat. Set aside.

Heat oven to 350°F. Combine all crust ingredients in large bowl. Beat at low speed, scraping bowl often, until mixture resembles coarse crumbs. Reserve 1 1/2 cups crumb mixture. Press remaining crumb mixture onto bottom of greased 13x9-inch baking pan. Spread filling over crust. Sprinkle with reserved crumb mixture.

Bake for 30 to 35 minutes or until golden brown. Cool completely.

Combine all drizzle ingredients in small bowl. Drizzle over cooled bars. Cut into bars.

Tuesday, May 26, 2009

The Farmer's Market


My best friend and I decided to take a trip to the farmer's market over the weekend. I can't even begin to tell you how much fun I had! It was the first time I've ever been, and now I'm totally hooked! You really can't beat the freshness of the produce or the prices! This is definitely going to be a once a week thing for me now!

Here are the things I got:

Rhubarb
Fresh local eggs
Asparagus
A sage plant
red potatoes
red onions
strawberries
leeks
Green onions
Whole nutmeg
3 tubs of other spices
Tomatoes

I got all of this for less than $30 and it's local and fresh!!! So if you have a local farmer's market, definitely check it out! I wish I started going to this years ago!!!

And you can definitely look forward to new recipes involving all of these great, fresh ingredients!

(And yes, that's a sofa chair in my kitchen. We were re-doing the floors in our living room!)

Friday, May 22, 2009

Wine of the Week


This weeks wine is undoubtedly one of my favorites. In fact, after I discovered it I found myself wanting to buy it each week instead of trying something new! Sooo I've been getting this and a "new" bottle, which isn't great for my wallet but I'm managing!

This wine really reminded me of one of my all time favorites; Kendall Jackson Chardonnay. It's a perfect wine to drink when you just want to sit outside on the porch and relax. It's flavors are rich but there is a great smoothness about it.

"87 RATING WINE ENTHUSIAST!- Tropical fruit with subtle scents of coconut and spice on the nose are followed by generous fruit flavors, a smooth texture, and a bright, balanced acidity. Enjoy as an apertif or serve with shellfish, grilled salmon with mango salsa, and mildly spiced cuisines. 3 GOLD MEDALS!" (Lamoreau Landing website)

This is a great chardonnay and so far, my favorite New York State wine.

Wednesday, May 20, 2009

Mini Lemon and Lime Tartlets


I can't take credit for finding this recipe. I can't even take credit for making it. But I can take credit for eating it!

Last week my mom had my husband and I over to celebrate my birthday and she made these to go along side our cake. Of course, she sent me home a few of my own along with the recipe!

These were really great and totally refreshing. This would be the perfect dessert to have at a barbecue over the summer! At first I thought I liked the lime ones best...but then changed to lemon after having one of each! Either way, the lemon or lime is delicious!
Ingredients
Source: Nestle

1 pkg. (16.5 oz.) refrigerated sugar cookie dough (I would make my own dough)
1 can (14 oz.) Sweetened condensed milk
1 pkg. (8 oz.) 1/3 less fat cream cheese (Neufchâtel) or regular cream cheese, at room temperature
2 cups thawed fat free, reduced fat or regular frozen whipped topping
1/4 cup lemon juice
2 teaspoons grated lemon peel
1/4 cup lime juice
2 teaspoons grated lime peel
Additional lemon and lime quarter slices, peel curls or grated peel (optional)

Directions

PREHEAT oven to 325º F. Paper-line 24 muffin cups.

CUT dough along pre-scored lines; place one piece of cookie dough in each muffin cup.

BAKE for 13 to 15 minutes or until golden brown. Cookies will be puffy. Cool completely in pan on wire rack.

BEAT sweetened condensed milk and cream cheese in large mixer bowl until smooth. Gently fold in whipped topping. Divide mixture into two medium bowls. Stir lemon juice and lemon peel into one bowl and lime juice and lime peel into other bowl.

POUR about 3 tablespoons lemon cream cheese mixture over 12 cookie cups. Repeat with lime cream cheese mixture and remaining cookie cups. Refrigerate for 2 hours or overnight. Decorate with lemon and lime quarter slices, curls or peel, if desired.

Tuesday, May 19, 2009

Chocolate Chip Banana Bread


This was by far the best banana bread I've had. There. I said it.

In all seriousness though, this bread was SO moist, flavorful, and the addition of the chocolate was absolutely fantastic. I am a chocolate lover though, so anywhere you want to put in some chocolate is OK by me!

I'm not the only one who thought this bread was great though; my husband and co workers devoured it! In fact, I had one coworker who described it as a "banana cake" rather then a banana bread, and I have to say I agree with him. While it certainly wasn't overly sweet, the texture just reminded you of a delicious cake!

I followed the recipe exactly, which obviously worked well and came out great. Next time I might use 1/2 butter and 1/2 shortening, just to see what it does to the flavor (and because I hate using shortening) but really this is just a great recipe as is. Definitely a keeper and a perfect way to use your overly ripened bananas!

Ingredients
Source: AllRecipes.com

1 cup shortening
2 cups white sugar
2 eggs
2 tablespoons mayonnaise (I used light mayo which worked fine!)
6 very ripe bananas, mashed
3 cups all-purpose flour
1/2 teaspoon salt
1 teaspoon baking powder
2 teaspoons baking soda
1 cup semi-sweet chocolate chips
1/2 cup chopped walnuts (I omitted)

Directions

Preheat oven to 350 degrees F (175 degrees C). Lightly grease two 9x5 inch loaf pans.

In a large bowl, cream together the shortening and sugar until light and fluffy. Stir in the eggs one at a time, beating well with each addition. Stir in the mayonnaise and bananas. Stir together the flour, salt, baking powder and baking soda. Blend the flour mixture into the banana mixture; stir just enough to evenly combine. Fold in the chocolate chips and walnuts.

Bake at 350 degrees F (175 degrees C) until a toothpick inserted into the center of the loaf comes out clean, about 50 to 75 minutes. Cool loaf in the pan for 20 minutes before removing to a wire rack to cool completely.

Monday, May 18, 2009

Roasted Peanut Potatoes


When I saw this recipe on Tastespotting, I was really excited to try it out!!! I'm always on the hunt for new side dishes, and this seemed to fit the bill perfectly.

These potatoes were so easy to make, and were perfectly crispy on the outside and soft on the inside. The flavors all work great together. They are really a great side dish, and they look pretty too! Additionally, they paired perfectly with Thai Turkey Burgers! Definitely a winning recipe!

The original recipe called for par boiling the potatoes first, but I thought that would be quite unnecessary. Why dirty another pot?! So I simply tossed them with the sauce and then roasted them for about 45 minutes and they came out perfect!

Ingredients
Adapted from Dutch Girl Cooking

1 pound potatoes (I used about 5 small/medium potatoes)
3 tbsp peanut butter
5 tbsp chicken broth (I didn't measure, but I know I used less then this!)
1/8 tsp ground ginger (I used freshly minced ginger...about a tbsp. worth)
1/4 tsp curry powder
1 small chili pepper (I omitted)
2 tbsp soy sauce
1 garlic clove
1 tsp sugar
1 tsp oil
1/8 tsp sesame oil (I added this)

Directions

Preheat oven to 375 degrees. Wash and peel potatoes and cut them into 1 1/2" pieces. Place in large bowl and set aside. In a medium bowl, whisk together remaining ingredients until everything is combined and a nice think sauce forms. Pour over potatoes and toss to coat completely.

In a baking dish that has been sprayed with non-stick spray, add potatoes and bake, uncovered, for about 45 minutes or until potatoes are fork tender. Additionally, toss potatoes 2 or 3 times during the course of cook time.

Friday, May 15, 2009

Wine of the Week

I stopped posting this for a while, mainly because I wasn't being quite so adventurous with the whole trying new wines thing!

However, I have taken an interest again in forcing myself to buy a different bottle each week and thought I'd pass on what I've found! I've also really been quite interested in the New York State wines.

If you didn't know, I come from the great state of New York. I am no where even CLOSE to the city though, so it's not very exciting, which is fine by me. There are a lot of cows up here. There's also a great wine region...did you know that? New York State is actually known for its Rieslings. They are really quite good. To learn more about the wine region in New York State, visit this website.

This week I tried Salmon Run Chardonnay. I'm going to go ahead and be honest, I bought it because I thought the label was cute. It was a good wine. It was very mild and smooth tasting. Not one flavor was dominate, and it was hard for me to pick out strong characteristics of it. It honestly wasn't my favorite wine, but I will go ahead and say that it would be good to serve with a strongly flavored meal. Because of it's smoothness, I think it would appeal to a wide variety of palates, and be great to serve with food so as to not overpower the meal. As a drinking wine however, I'd probably pick something else!

Tuesday, May 12, 2009

Shrimp Scampi


I haven't always liked shrimp. In fact, when I was younger, I really disliked it. I never hated it (like mushrooms...yech!) but I never ordered it out either. But lately I have been craving it. When I went to Florida, I refused to get any chicken because I make it at home so much and I really like to try regional cuisine when I travel. I ended up getting shrimp quite a bit and really found that I enjoyed it.

So I was anxious to try Shrimp Scampi, and went with Tyler Florence's recipe. It was absolutely fantastic!!! I couldn't get over how easy it was to make, and it resulted in an absolutely fantastic meal! The flavors worked so well together...and did I mention it was easy?! Plus, all of the ingredients are things that I almost always have on hand! This was a great recipe, one that I will most certainly make again!

Ingredients
Source: Tyler Florence

1 pound linguini (I used dried homemade fettuccine - and probably not a pound's worth!)
4 tablespoons butter (I used 2)
4 tablespoons extra virgin olive oil, plus more for drizzling (I used 2)
1 large shallot, finely diced
5 cloves garlic, sliced
Pinch red pepper flakes, optional (I omitted)
20 large shrimp, about 1 pound, peeled and deveined, tail on (mine were on the smaller side)
Kosher salt and freshly ground black pepper
1/2 cup dry white wine (I used more like 3/4 cup)
1 lemon, juiced
1/4 cup finely chopped parsley leaves (I omitted)
1 tsp cornstarch mixed/dissolved in a splash of water (I added this)
Directions

For the pasta, put a large pot of water on the stove to boil. When it has come to the boil, add a couple of tablespoons of salt and the linguini. Stir to make sure the pasta separates; cover. When the water returns to a boil, cook for about 6 to 8 minutes or until the pasta is not quite done. Drain the pasta reserving 1 cup of water. (I omitted this...I think the sauce would have been too thin with an extra cup of water)

Meanwhile, in a large skillet, melt 2 tablespoons butter in 2 tablespoons olive oil over medium-high heat. Saute the shallots, garlic, and red pepper flakes (if using) until the shallots are translucent, about 3 to 4 minutes. Season the shrimp with salt and pepper; add them to the pan and cook until they have turned pink, about 2 to 3 minutes. Remove the shrimp from the pan; set aside and keep warm. Add wine and lemon juice and bring to a boil. I added the cornstarch mixture at this point, to thicken the sauce up. Add 2 tablespoons butter and 2 tablespoons oil (I omitted this step, I didn't think the extra butter/oil was necessary). When the butter has melted, return the shrimp to the pan along with the parsley and cooked pasta and reserved pasta water (I omitted adding the extra pasta water, I think the sauce would have been much to thin with it). Stir well and season with salt and pepper. Drizzle over a bit more olive oil and serve immediately.

Monday, May 11, 2009

Fresh Berry Cake for Mom on Mother's Day


As I stated in my previous post, my mom really hates things that are too sweet. She much prefers natural, fresh flavors over things that are unnaturally sweetened. So when I found this Fresh berry cake on Good Things Catered (the ultimate source for cake recipes since they never come out wrong!) I was really excited to make it for her on Mother's Day.

I know this is a food blog, but I just have to say that I am not shy to say that my mom is truly my best friend. We have always been super close and have done tons of stuff together. Most of my life has been dedicated to horse showing, and mom was always right there with me, at every show and at every trip to the barn. Whether it was just cheering me on, cleaning tack, mucking stalls or keeping me sane before nationals, she bent over backwards for me. And now that I'm married and settled into a new house, she is still the same mom. Helping me paint rooms, re-decorate or give me much needed advice about having kids and keeping a home. She truly is an amazing woman and I am so honored to get to call her my mom.

So on to the cake...it was fabulous! Not much more to say about it! Mom gave me a piece to try before she took it home to enjoy with my dad and brother! It had a great texture and the berries were delicious and fresh. I only wish it was berry season around here so i could have used my own berries from my berry bushes, but either was it was great. I filled the cake with some of the Swiss meringue buttercream that I had made, however I added a bit of raspberry extract which really lent itself perfectly to the flavors of the cake. This is a great light cake that won't weigh you down. It's perfect for spring or summer!!

Ingredients
Source: Good Things Catered
Originally from Williams-Sonoma

2 c. plus 4 Tbsp all-purpose flour, divided
1/2 tsp baking soda
1/4 tsp salt
12 Tbsp (1 1/2 sticks) unsalted butter, room temperature
2 1/4 c. granulated sugar
1 Tbsp Cointreau (I used Chambord since it was all I had on hand!)
5 eggs, at room temperature
2/3 c. sour cream
3/4 c. blueberries
3/4 c. raspberries

Directions
-Preheat oven to 350 degrees and prepare two 10in cake pans. (I used 9")
-In medium bowl sift together 2 c. plus 2 Tbsp flour, baking soda and salt.
-In bowl of large stand mixer with flat beater attachment, cream butter and sugar until light and fluffy, about 5-6 minutes, scraping as needed.
-Add the Cointreau and beat until incorporated, about 1 minute.
-Add the eggs one at a time, beating well after each addition.
-Reduce speed to low and add the flour mixture in three additions, alternating with the sour cream and beginning and ending with the flour.
-Beat each addition just until incorporated, stopping the mixer occasionally to scrape down the sides of the bowl.
-In the bowl the flour mixture was in, add berries and 2 Tbsp reserved flour and toss to combine.
-Using a rubber spatula, gently fold berries into batter.
-Spoon batter into prepared pans and bake until toothpick inserted into the center comes out clean, about 50 minutes.
-Transfer the pan to a wire rack and let the cake cool in the pan for 15 minutes.
-Invert cake to release from pan and let cool completely on wire rack before frosting and serving.

~*Me and Mom*~

Swiss Meringue Buttercream


I've been wanting to try this icing for what seems like ages now, and I finally had the opportunity to do so this past weekend! I made my mom a mothers day cake, and one thing that I know she really hates is icing that is "too sweet". I've heard so many good things about Swiss Meringue Buttercream, that I was really anxious to try it for her.

This icing was so great!!! My mom absolutely loved it, she said it tasted just like the buttercream under the fondant on my wedding cake, which she really loved. It's definitely not sickeningly sweet which is very pleasant. I actually had a lot of fun making it, too. Granted it was a bit time consuming but with my Kitchen Aid stand mixer I didn't have any issues at all. It's really funny to watch it transform, too. When I was whisking the butter into the egg white mixture I was sure I did something wrong. It just looked soupy and not at all like buttercream. Then on one of my last few pieces of butter, I looked down and it had transformed in an instant! I was like a kid who just finished a science experiment! So the moral of the story is, if you make this, don't give up on it! Even if it looks wrong throughout the process, it's probably not if you followed the recipe. For me, it didn't look like real buttercream until the VERY end.

***Please note: I halved this recipe for one 9" 2 - layer cake. I filled the middle with the buttercream as well, which worked perfectly. I didn't have too much or too little, halving it was perfect for the size cake I made.

Ingredients
Source: Martha Stewart

2 1/2 cups sugar
10 large egg whites
4 cups (8 sticks or 2 pounds) unsalted butter, cut into pieces (I used room temperature)
2 teaspoons pure vanilla extract
Directions
  1. Place sugar and egg whites in the heat-proof bowl of an electric mixer. Set bowl over a pan of gently simmering water, and whisk until sugar has dissolved and egg whites are hot to the touch, about 3 minutes. Test by rubbing the mixture between your fingers; it should feel completely smooth.
  2. Transfer bowl to mixer stand. Using the whisk attachment, beat on high speed until mixture has cooled completely and formed stiff and glossy peaks, about 10 minutes.
  3. Add the butter, one piece at a time, and beat until incorporated after each addition. Don't worry if the buttercream appears curdled after all the butter has been added; it will become smooth again with continued beating. Add vanilla, and beat just until combined.
  4. Switch to the paddle attachment, and beat on the lowest speed to eliminate any air pockets, about 5 minutes. If using buttercream within several hours, cover bowl with plastic wrap, and set aside at room temperature in a cool environment. Or transfer to an airtight container, and store in the refrigerator, up to 3 days. Before using, bring buttercream to room temperature, and beat on the lowest speed with the paddle attachment until smooth, about 5 minutes.

Wednesday, May 6, 2009

BLT Macaroni Salad


Now that food from the grill is officially in our regular dinner rotation, it was high time I made some macaroni salad to go along with it! I found this recipe on Buns in my Oven and was anxious to give it a try as a departure from my 'regular' standby.

We thought this was really good! I mean, who doesn't love bacon....in anything? It definitely takes on a whole new feel and taste with the addition of the green onions and tomatoes, but they were a welcome addition! And I know that there is technically no "L" in the BLT Mac salad, but I think the green onions kind of give it that 'green' feel that one would be looking for in a BLT! All in all this was a great recipe that I'm sure to be making again!!!

Ingredients
Source: Buns in my Oven

1lb. macaroni pasta
8 slices bacon
2 medium-large tomatoes (I only used 1 tomato as my husband isn't a huge fan of tomato 'chunks')
2-3 bunches of green onions, plus extra for garnish
1 cup mayonnaise (NOT Miracle Whip)
1/4 cup white vinegar
salt and pepper, to taste

Directions

1. Bring a large pot of salted water to a boil and add macaroni. Cook until al dente, about 8 minutes. Drain and pour into large mixing bowl.

2. Fry 8 slices of bacon and, when cool enough to handle, crumble into bite sized pieces. Set aside.

3. Chop tomatoes and green onions, add to small mixing bowl. Mix in mayonnaise and vinegar. Add salt and pepper, to taste.

4. Pour mayonnaise mixture over macaroni and stir together well. Stir in the crumbled bacon.

5. Serve in a pretty dish with some chopped green onions sprinkled on top. Enjoy!

Monday, May 4, 2009

Spinach Artichoke Bites


As soon as I saw this recipe appear on Colleen's blog Cooking This and That, I bookmarked it right away to use at my next gathering. So when my in laws came over last weekend, I knew I had to try these!

In my opinion, these are the perfect little appetizer. Most people love spinach artichoke dip and these are presented so conveniently so your guests can take them and walk around and not be tied to the dip bowl! The only issue I had was that I could not find won-ton wrappers anywhere! I scowered my whole grocery store and even asked 2 separate employees who could not track them down for me. Any idea where I can find these in my store? Well either way, I improvised and used Fillo Dough. I got the pre-made shells and also made my own, and both were great. I also made the filling the night before and refridgerated it so all I had to do on the day of my gathering was fill them and bake!

Ingredients
Adapted from Cooking this and That
Originally from Daily Deliciousness

30 wonton wrappers (I used Fillo dough/cups)
1 package (8 ounces) cream cheese, softened
1 box of frozen chopped spinach, thawed and drained (I used about 3/4 of the box)
4 ounces marinated artichokes, drained and chopped (I used almost a whole can)
1 cup shredded mozzarella cheese
1/3 cup mayo
1/2 shallot, minced(I added this)
2-3 garlic cloves, minced (I added this)
1-2 tsp. extra virgin olive oil (I added this)
salt to taste
pepper to taste

Directions

Preheat oven to 350 degrees F. Lightly coat mini-muffin tins with cooking spray.

In a small skillet over medium heat, add olive oil, garlic and shallots and cook just until garlic is fragrant and shallots are sofetened, about 3-5 minutes.

Mix cream cheese, spinach, artichokes, shredded cheese, mayo, garlic, shallots, salt and pepper in a medium sized bowl.

Line mini-muffin pan with wonton wrappers (or fillo dough), lightly pressing into place to form a cup. Using a small spoon, fill each cup with mixture almost to the top.

Bake for 10-12 minutes, until edges are browned and crisp and the filling is hot and melty.
Let cool for about 5 minutes before serving.

Friday, May 1, 2009

Mediterranean Turkey Burgers


Now that the weather is half way decent up here in the north, my husband and I have been craving burgers on the grill. However, I'm not the kind of girl that can have a regular beef burger a lot...I get bored. So to switch it up I've been making different kinds of turkey burgers. Much healthier and you can really get creative! So when I saw these Mediterranean Turkey Burgers on Vintage Victuals, I was anxious to give them a try. Unfortunately, I didn't have any Greek Seasoning so I did a lot of subbing with some fresh herbs and added quite a few other things that happened to be in my kitchen but the result was really fantastic! I put a slice of gouda cheese on my burger for extra cheesiness (and because it's probably going to go bad soon), but to be honest it didn't add much because the burger itself was so flavorful. That being said, these burgers are loaded with flavor in every bite and totally hit the spot. They were the something different I crave, relatively healthy, and absolutely delicious. Overall, a great turkey burger!

Ingredients
Adapted from Vintage Victuals

1 lb. ground turkey breast
2 ounces feta cheese, cubed or crumbled (I used fat-free crumbled)
1/2 shallot, minced
2-3 cloves of garlic, minced
1/2 sprig fresh rosemary, minced
2-3 sage leaves, minced
1/2 onion, sliced
Salt
Pepper
pinch of sugar
1 tsp extra virgin olive oil
Juice of 1/2 lemon, very lightly juiced (About 1-2 tsp.)
2 hamburger buns

Directions
In a large bowl, combine turkey, shallot, garlic, rosemary, sage, salt, pepper and lemon juice until thoroughly combined. Form into 4 equal sized thin patties, and in the center of 2 patties sprinkle as much feta cheese as desired. Put remaining 2 patties over the patties with feta and completely seal edges. Grill burgers until cooked throughout. Meanwhile, in a small sauce pan add olive oil and onion slices. Sprinkle with sugar. Cook on medium heat for about 20 minutes until caramelized, stirring frequently. Server burgers on toasted buns and top with caramelized onions.