Showing posts with label Cheese. Show all posts

Monday, September 27, 2010

Chutney Chicken


First of all, let me just say I had no idea what to call this....but it has mango chutney in it so chutney chicken it is.

Actually, the reason I made this is because my aunt gave me a beautiful little jar of mango chutney. (I went on their website to scope out other products, but apparently they only ship to the UK! What a shame! There are so many things I'd love to try. But if you are in the UK, here's the website... Mrs. Bridges...and just know that I'm jealous!) Anyways, she won it at a bridal shower and told me that I would appreciate it more then her, so being the awesome aunt that she is, gave it to me. But truth be told, I had no idea what to do with it. I'm not familiar with chutney at all. I looked at things online that said it was good with cream cheese and in curry's. I have no idea what a curry even is (seriously) but I decided to go with the cream cheese thing.

It actually worked out really well! I just added a little of this and that, and it turned out deliciously! This could be made for one or two people, depending on how hungry you are! I just made it for myself, but definitely didn't finish it. But if you are feeding it to someone extra hungry, it's a very easy recipe to double.

Ingredients

1 boneless skinless chicken breast, cut into 1/2" pieces
1/4 of a yellow onion, chopped
2 garlic cloves, diced
1/2 cup chicken stock
3 oz. cream cheese
2 tbsp. mango chutney
2-3 fresh basil leaves, chopped
salt & freshly ground pepper

Directions
In a medium skillet (coated with non stick spray) over medium-high heat, add chicken and season with salt and pepper. Keep the chicken moving until all the chicken pieces are light golden brown and cooked all the way through. Add onions and cook another 3-4 minutes until onions are softened. Finally, add garlic and cook for another minute or two, being careful not to burn the garlic. Next add the chicken stock, basil leaves, mango chutney and cream cheese. Stir until cream cheese is melted and incorporated into the sauce. Serve hot over white rice.

Monday, September 13, 2010

Goat Cheese Stuffed Chicken with Cranberry Compote


I am personally a big fan of cranberries and often get annoyed that they're treated as a one-holiday food. The other day I was particularly in the mood for them, and thought they'd be good on chicken.

I stuffed my chicken with goat cheese for some added flavor and depth, then topped the whole thing with a quick and easy cranberry compote that I make every Thanksgiving.

The result was a deliciously moist and flavorful chicken that paired so nicely with the cranberry compote. I served it with white rice which worked wonderfully. This is a perfect dish for fall especially!

Ingredients
Cranberry Compote adapted from Emeril Lagasse

2 boneless, skinless chicken breasts pounded thin
Aprox. 2-4 tbsp goat cheese
1/2 cup frozen or fresh cranberries
1/2 cup water
1/2 tsp. cinnamon
1/2 tsp. good vanilla extract
2+ tsp. honey
1 tbsp. cornstarch
3 tbsp. milk
aprox. 1/2 tsp. lemon zest

Directions

Preheat oven to 350 degrees and grease a baking dish with non stick spray. On the bottom of both chicken breasts, spread a liberal amount of goat cheese and "roll" chicken up and secure with toothpicks. Place in baking dish and cover with foil. Bake for 1 hour, removing foil after 45 minutes.

While the chicken is cooking, make the cranberry compote. In a medium saucepan, add cranberries, water, cinnamon, vanilla, zest and honey. Stir to combine. On medium heat, bring to a gentle boil and continue to cook until the cranberries have "popped" and the mixture thickens. Meanwhile in a small bowl, whisk together milk and cornstarch and add it to thickened cranberry mixture. Taste everything and make sure it's sweetened to your liking (if not, add more honey).

Pour on top of cooked chicken and serve hot.


Tuesday, March 30, 2010

Creamy White Bean Soup


I absolutely love making soup. Soup recipes tend to make a lot, so not only do I get to enjoy it for dinner, I also get to enjoy it for subsequent lunches at work. This is a healthy soup that is easy to make.

This soup is flavorful, healthy and hearty. The beans create a wonderful creaminess to the soup, especially when blended. The kale adds so much color and flavor, that I seriously load this soup with it! I really love this recipe and will definitely make it again and again.

Ingredients
Adapted from The Daily Green, originally published in Good Housekeeping

1 tablespoon olive oil
1 medium onion, finely chopped
1 medium celery stalk, finely chopped
1 garlic clove, minced
2 cans (15 1/2 to 19 ounces each) white kidney beans (cannellini), rinsed and drained
1 3/4 cups chicken broth
1/4 teaspoon coarsely ground black pepper
2-3 springs fresh thyme, leaves only
2 cups water
1 head fresh kale
1 tablespoon fresh lemon juice
Freshly grated Parmesan cheese (optional)
Optional - aprox. 1 cup cooked small pasta (I used little stars)

Directions
In 3-quart saucepan, heat oil over medium heat until hot. Add onion and celery and cook, stirring occasionally, until tender, 5 to 8 minutes. Add garlic, cook, stirring, 30 seconds. Add beans, broth, pepper, thyme, and water; heat to boiling over high heat. Reduce heat to low; simmer, uncovered, 15 minutes.

Meanwhile, trim tough stems from kale and discard; thinly slice leaves.

With slotted spoon, remove 2 cups bean and vegetable mixture from soup; set aside. Blend the rest of the soup with an immersion blender and puree until smooth.

Stir in reserved beans, vegetables and pasta (if using). Heat to boiling over high heat, stirring occasionally. Stir in kale and cook until wilted, about 1 minute. Stir in lemon juice and remove from heat. Serve with Parmesan, if you like.

Thursday, March 25, 2010

Salmon En Papillote


Salmon en Papillote is something that I've been meaning to make for a long time, but just haven't gotten around to. I definitely thought the hardest part about making this was trying to get the parchment paper to stay folded around the salmon! So, it was pretty easy. Perfect for a weeknight.

The result of this recipe was a super flavorful, very moist salmon fillet with a decidedly Mediterranean feel. Also, with the addition of fresh veggies and herbs, you have yourself quite a nice dinner all in one "Papillote."

Ingredients
Adapted from RecipeZaar

1/2 small onion, diced
2 garlic cloves, minced
1 small carrot, julienned
1/2 lemon
1 tomato, chopped
1 teaspoon fresh thyme leaves
5 tablespoons white wine
1-2 (3 1/2 ounce) salmon fillets
light feta cheese
salt & freshly ground black pepper

Directions
Preheat the oven to 400°F. Combine the onion, garlic, tomato, carrots and thyme in a bowl with the wine. Lightly squeeze lemon half over the onion mixture and mix together. Slice 2-3 thin pieces of lemon and set aside. Season the salmon with salt and pepper and place in a bowl and pour over the marinade. Leave for 5 minutes.

Lay out 1 large sheet of baking parchment on a baking tray and put a piece of salmon in the center. Spoon over the marinade and cover the fish, top with lemon slices and fold the paper to make a packet. Place in a dish and bake for 15 minutes or until fish is opaque in the center and flakes easily. Open the pouch, sprinkle feta cheese over the fish and serve.

Sunday, December 6, 2009

Bacon Wrapped Chicken Stuffed with Cream Cheese


This is a recipe I came up with when I felt totally uninspired for dinner one night. I had bacon and cream cheese on the verge of going bad in the fridge and wanted to use them up. My husband and I were happily surprised with how this came out. The bacon added so much flavor to the chicken breasts while the creamy cheese in the center was a wonderful addition. This is a meal I'm definitely making again.

Ingredients
2 boneless, skinless chicken breasts pounded thin
3 oz light cream cheese
4-6 fresh sage leaves, minced
1 small shallot, minced
4-6 slices bacon
salt
pepper

Directions
Preheat oven to 350 degrees and grease a baking dish with non stick spray. In a small bowl, add the cream cheese and warm in microwave for 30 second intervals. After each 30 seconds, stir the cream cheese until it's completely smooth. Add sage, shallots, salt and pepper to taste. Stir to combine. On the bottom of both chicken breasts, spread a liberal amount of the cream cheese mixture and "roll" chicken up and secure with toothpicks. Wrap 2-3 slices of bacon around each chicken breasts and secure bacon to chicken in necessary. Place in baking dish and cover with foil. Bake for 1 hour, removing foil after 45 minutes. Remove toothpicks and serve.

Tuesday, October 6, 2009

Healthy Turkey Meatloaf


This is a recipe that my mom used to make frequently when my brother and I were younger. It's healthy, quick to come together, and really delicious. Even my meat loving husband loves it. I really have no idea where the original recipe came from, but I've always remembered how to make it from memory. Hope you enjoy it as much as we do!

Ingredients
Source: My Mom

1 package ground turkey (around 1.25 lbs)
1 egg white
1 carrot, shredded
1 celery stalk, finely chopped
1/2 onion, chopped
2-3 garlic cloves, minced
1/2 - 3/4 cup italian seasoned bread crumbs
1/2 cup marinara sauce
shredded part skim mozzarella cheese
salt
pepper

Directions
Preheat oven to 350 degrees and grease a loaf pan with non stick spray. In a large bowl, combine turkey, egg white, carrot, celery, onion, garlic, salt and pepper to taste, and bread crumbs. Mix with your hands until well combined and put in loaf pan. Drizzle marinara sauce over loaf and spread using a spoon. Sprinkle as much mozzarella cheese as you want over the whole loaf. Cover with aluminum foil and bake for 1 hour. Slice and serve!

Tuesday, September 1, 2009

Parmesan Cheese Bread


Fall is starting to settle in up here...the days are getting shorter and the nights are getting colder. This is perfectly fine by me, since fall is absolutely my favorite season. This is the time of year where I start to cook heartier and bake lots of breads. I decided to try this recipe to pair with my favorite Corn Chowder, and it was absolutely delicious.

This was such a simple bread to make. It came together quickly and resulted in a wonderfully flavorful and well textured bread. I like that it's baked as rolls, so they are easy to pull apart.

The only things I did differently were: 1 - I used way more then 1/2 cup Parmesan. After I went through the first 1/2 cup I just kept shredding until I had what I thought was enough. So really after the first 1/2 cup I stopped measuring...but just know that I did use more then what the recipe called for. 2 - I made 6 very large rolls rather then the 12 listed in the recipe. It was just my husband and I eating them, so 6 big ones worked out well for us (and still yielded leftovers).

This is a great recipe and would be just perfect for company. After all, is there anything much better then bread and cheese?!

Ingredients
Source: Williams-Sonoma

3 3/4 cups unbleached bread flour, plus more as needed
1 Tbs. (1 package) active dry yeast
2 tsp. salt
1 1/3 cups warm water
1/2 cup freshly grated Parmigiano-Reggiano cheese (I used more)
Extra-virgin olive oil for brushing

Directions

In the bowl of a heavy-duty stand mixer, combine the 3 3/4 cups flour, the yeast and salt. Add the warm water and stir with a wooden spoon until just mixed together. Sprinkle 1/4 cup of the cheese over the dough. Fit the mixer with the dough hook and begin mixing and kneading on very low speed. When the mixture pulls away from the sides of the bowl, increase the mixer speed to medium-low and continue to knead until the dough is smooth and elastic, 12 to 15 minutes, adding more flour if the dough is too sticky. Transfer the dough to a floured work surface and knead by hand for 1 to 2 minutes.

Form the dough into a ball, brush it with a little olive oil and return it to the bowl. Cover with a towel and let rest in a warm, draft-free place until doubled in bulk, 1 to 1 1/2 hours.

Position a rack in the lower third of an oven and preheat to 425°F. Brush a 9-inch round pan with olive oil.

Place the remaining 1/4 cup cheese on a plate. Punch down the dough. Return it to the floured work surface and knead a few times. Then, using your palms, roll the dough to form a log about 12 inches long. Cut the log in half crosswise, then cut each half crosswise into 6 equal pieces. Knead each dough piece a couple of times, roll it between the palms of your hands into a ball, and then roll it in the cheese to coat lightly and evenly, shaking off any excess. (I had to add more oil to each ball of dough as it was too dry for the cheese to adhere. This worked well.)As each ball is coated, place it in the prepared pan, resting it against the rim and pressing down slightly to form a 2-inch disk. Arrange 9 balls around the rim and 3 balls in the center. Cover loosely with plastic wrap and let rise again in a warm place until doubled in bulk, 30 to 40 minutes.

Sprinkle the top with the cheese remaining on the plate. Using a razor blade or sharp knife, cut a slash 1/4 inch deep in the top of each ball. Bake for 10 minutes. Reduce the oven temperature to 375°F and continue baking until brown and crusty, 20 to 30 minutes more. Transfer the pan to a wire rack and let the rolls rest in the pan for 1 to 2 minutes, then remove them from the pan; the rolls will come out in a single loaf.

Serve the loaf warm, breaking off the rolls at the table. Or let cool, top side up, on the rack. Makes 12 rolls (or 6 large rolls).

Sunday, August 23, 2009

Brie Cheese and Roast Beef Panini


When my mom and I visited one of our favorite restaurants for lunch, I decided to try the special of the day. A roast beef panini with brie cheese and caramelized onions on sourdough bread. After the first bite, I was in panini heaven. The tender beef, soft onions and melty brie cheese all harmonized in one truly amazing panini. As soon as I finished it I knew I had to make it for my husband. It's really an easy panini to make and results in a great and hearty lunch.

Ingredinets
Adapted from one of my favorite restaurants

4 slices sourdough bread (for 2 sandwiches)
1 small onion, sliced
aprox. 1/2 circle brie cheese cut into think chunch and with the rind removed
thinly sliced roast beef
aprox. 1 tbsp. extra virgin olive oil
pinch of sugar
butter, softened

Directions
In a small saucepan over medium heat, add about 1 tbsp extra virgin olive oil. Add onions and a pinch of sugar. Cook for about 10-20 minutes, stirring frequently, until onions are wilted and caramelized. Set aside.

Butter 1 side of each piece of bread, and on the other side add roast beef, caramelized onions and pieces of brie cheese. Add as much as you want to each sandwich. Top with other slice of bread, buttered side out.

Place each sandwich on a preheated panini maker, and cook for about 5-10 minutes, until the outside of the sandwich is golden brown. Remove, and using a serated knife cut sandiwich on an angle. Serve hot, and with horseradish if desired.

Zucchini Feta Casserole


This is by far one of my favorite summertime dishes. It's fresh, flavorful and filling! I always end up with way too many zucchinis from my garden, so this is a great recipe to make because it uses a whole zucchini. My inspiration was originally from a Cooking Light recipe, however I have altered it to my tastes quite a bit over the years, so I don't think it's much like the original! The reason I like this meal so much is because you can adapt it to suit your mood and tastes. Sometimes I add tomatoes, use different cheeses, or add in chopped chicken breast. I was also thinking that artichokes would be great in this, although I haven't tried that yet. In addition, it's a really quite a healthy recipe! Overall, this meal is the perfect summertime dinner.
Ingredients
Adapted from Cooking Light

1 14.5 oz. box Penne Pasta
1 medium zucchini, thinly sliced
1 onion, chopped
3-4 cloves garlic, minced
2 boneless skinless chicken breasts, chopped and cooked (optional)
2 medium tomatoes, chopped (optional)
Extra Virgin Olive Oil
kosher salt
freshly ground black pepper
2 teaspoons all purpose flour
1/2 cup low sodium chicken stock
1/2 cup (2 oz.) crumbled feta cheese
1/2 cup (2 oz.) shredded part skim mozzarella cheese

Directions
Preheat oven to 400 degrees. Cook pasta in boiling salted water for about 10 minutes, or until al dente. Drain and set aside.

In a large saute pan over medium-high heat, add about 1-2 tablespoons olive oil, then zucchini, onion and garlic. Cook for about 10 minutes or until onion is tender and opaque, and zucchini is wilted. Then add tomatoes (if desired) and cook for another 5 minutes or until tomatoes are soft. In a small bowl, whisk together chicken stock and flour until thoroughly combined, then add to vegetables. Cook for another minute or two, until sauce is thickened. Add salt and pepper to taste.

In a large bowl, combine pasta, zucchini mixture, feta cheese, and cooked chicken (if desired) until combined. Pour into a 13x9 baking dish coated with cooking spray. Sprinkle mozzarella cheese over entire casserole and bake at 400 degrees for about 20 minutes, or until bubbly and lightly browned.

Wednesday, August 19, 2009

Tomato & Goat Cheese Tart


This tart exudes summer. The freshness of the tomato and basil is balanced by the rich puff pastry shell and the goat cheese works perfectly with all the flavors described. In addition, the caramelized onions add a wonderful smoothness. This tart would be the perfect addition to any summer party. My husband and I both enjoyed this tart very much, and I will definitely be making it again!

Ingredients
Source: Ina Garten

1 package (17.3 ounces/2 sheets) puff pastry, defrosted
Good olive oil
4 cups thinly sliced yellow onions (2 large onions)
3 large garlic cloves, cut into thin slivers
Kosher salt and freshly ground black pepper
3 tablespoons dry white wine
2 teaspoons minced fresh thyme leaves (I used herbs de Provence instead)
4 tablespoons freshly grated Parmesan, plus 2 ounces shaved with a vegetable peeler
4 ounces garlic-and-herb goat cheese (recommended: Montrachet) (I used plain goat cheese)
1 large tomato, cut into 4 (1/4-inch-thick) slices
3 tablespoons julienned basil leaves

Directions

Unfold a sheet of puff pastry on a lightly floured surface and roll it lightly to an 11 by 11-inch square. Using a 6-inch wide saucer or other round object as a guide, cut 2 circles from the sheet of puff pastry, discarding the scraps. Repeat with the second pastry sheet to make 4 circles in all. Place the pastry circles on 2 sheet pans lined with parchment paper and refrigerate until ready to use.

Preheat the oven to 425 degrees F.

Heat 3 tablespoons of olive oil in a large skillet over medium to low heat and add the onions and garlic. Saute for 15 to 20 minutes, stirring frequently, until the onions are limp and there is almost no moisture remaining in the skillet. Add 1/2 teaspoon salt, 1/4 teaspoon pepper, the wine, and thyme and continue to cook for another 10 minutes, until the onions are lightly browned. Remove from the heat.

Using a sharp paring knife, score a 1/4-inch-wide border around each pastry circle. Prick the pastry inside the score lines with the tines of a fork and sprinkle a tablespoon of grated Parmesan on each round, staying inside the scored border.

Place 1/4 of the onion mixture on each circle, again staying within the scored edge. Crumble 1 ounce of goat cheese on top of the onions. Place a slice of tomato in the center of each tart. Brush the tomato lightly with olive oil and sprinkle with basil, salt, and pepper. Finally, scatter 4 or 5 shards of Parmesan on each tart.

Bake for 20 to 25 minutes, until the pastry is golden brown. The bottom sheet pan may need an extra few minutes in the oven. Serve hot or warm.

Friday, August 14, 2009

Dill and Cheddar Cornbread


I had a bunch of beautiful fresh dill from the farmers market that proved to be too much for my batch of Dill Pickles (that's another post!), so I was looking for a way to use it before it went bad. Then I was watching Barefoot Contessa on TV and Ina was making this delicious looking cornbread along with some braised short ribs. I thought this would be the perfect thing to make with my fresh dill.

I really loved this cornbread. I'm a huge fan of dill and that along with the sharp cheddar and moist corn bread was a perfect combination in my book. However, I do feel obliged to mention that my husband just said it was "weird"...so I don't think he loved it as much as I did. I think that he was surprised with the flavor of the dill in such a traditional corn bread. Either way, I can assure you that if you like dill you will love this cornbread! A perfect addition to a Sunday dinner.

Ingredients
Source: Ina Garten

3 cups all-purpose flour
1 cup yellow cornmeal
1/4 cup sugar
2 tablespoons baking powder
2 teaspoons kosher salt
2 cups milk
3 extra-large eggs, lightly beaten
1/2 pound (2 sticks) unsalted butter, melted, plus extra to grease the pan
8 ounces aged extra-sharp Cheddar, grated, divided
1 cup minced fresh dill

Directions

Combine the flour, cornmeal, sugar, baking powder, and salt in a large bowl. In separate bowl, combine the milk, eggs, and butter. With a wooden spoon, stir the wet ingredients into the dry until most of the lumps are dissolved. Don't overmix! Mix in 2 cups of the grated Cheddar and the dill, and allow the mixture to sit at room temperature for 20 minutes.

Meanwhile, preheat the oven to 350 degrees F. Grease a 9 by 13 by 2-inch baking pan.

Pour the batter into the prepared pan, smooth the top, and sprinkle with the remaining grated Cheddar. Bake for 30 to 35 minutes, or until a toothpick comes out clean. Cool and cut into large squares. Serve warm or at room temperature.

Tuesday, July 28, 2009

Stuffed Zucchini


With an abundance of fresh zucchini growing in my garden, I am always looking for creative ways to prepare it. This recipe is extremely easy so it is perfect for weeknight cooking. The ricotta dresses up the zucchini without overwhelming the flavor. In addition, I use reduced fat ricotta so it's really not that bad for you. This can easily be served as a vegetable or a side and is wonderfully flavorful!

Ingredients
Source: Williams-Sonoma Bride & Groom Cookbook, page 157

4 Zucchini (I used 2)
Olive Oil for greasing
1 cup fresh ricotta (I use reduced fat)
1/4 Grated Parmesan
1 tbsp. flour
Kosher salt
Fresh ground pepper
Pinch of ground cayenne pepper (I omit)
Pinch of grated lemon zest (I omit)
2 tbsp. freshly grated pecorino romano or parmesan
Leaves from 1 large spring fresh basil
2 small garlic cloves, minced (I added)

Directions

Bring a large pot of salted water to a boil. Add the whole zucchini and reduce the heat to a simmer. Simmer the zucchini just until tender, 10-15 minutes. Drain and let cool.

Preheat the broiler (I just set the oven to 400 degrees and use the top rack). Lightly oil a large baking pan or sheet. In a bowl, stir together the ricotta and 1/2 cup Parmesan with the flour, salt and black pepper to taste, the cayenne, lemon zest and minced garlic. Slice the zucchini in half lengthwise and scoop out the seeds with a small spoon. Place the zucchini in the prepared baking pan. Season with salt and pepper and fill with the cheese mixture to form soft mounds. Sprinkle with he pecorino romano cheese. Place under the broiler until the cheese is warm and starts to brown slightly, 5-10 minutes. Remove from the broiler, chop the basil leaves, and sprinkle on top. Serve warm.

Sunday, July 26, 2009

Goat Cheese Stuffed Chicken Breasts


This is another meal that is simple enough for a weeknight, but can also be dressed up to serve to company. Just remember that goat cheese tends to be something that you either love or hate, so if you do decide to make this for company make sure they like goat cheese first! Fortunately, my husband and I like it very much so this recipe was a winner.

The original recipe calls for frying the chicken in a saute pan, but I honestly prefer to bake my chicken. It makes much less of a mess and is healthier. Plus, you can just put it in the oven and forget about it while you make your side dish or vegetable without constantly having to hover over it. This recipe is quick, easy and flavorful. A combination that is always welcome in my book!

Ingredients
Adapted from: Williams-Sonoma Bride & Groom Cookbook, page 110

4 skinless boneless chicken breast halves (I used 2 whole breasts)
kosher salt and pepper
2 oz. fresh goat cheese
4 thin slices prosciutto (I used 2)
8 fresh sage leaves
2 cups flour (I used 1 cup)
2 eggs, lightly beaten (I used 1) with 1-2 tbsp. water
2 cups fine dried bread crumbs (I used 1 cup Panko)
1/4 cup olive oil (I omitted)

Directions
Preheat over to 350 degrees. Season the chicken breasts with salt and pepper on both sides. Using a boning knife, cut a horizontal incision into each breast, without cutting the breasts in half, creating a pocket for stuffing.

Pound each breast between 2 pieces of parchment paper until they are about 3/4 of an inch thick. Rub each breast lightly with olive oil.

Stuff each pocket with about 1 1/2 Tbsp. of the goat cheese, spreading evenly, then follow with 1 slice of prosciutto and 2 sage leaves. I threaded a tooth pick through the incision to keep the stuffing in.

Arrange a plate with the flour, bowl with the eggs, and plate with the bread crumbs. Dredge each stuffed breast in flour, then dip it in the eggs, and dredge in the bread crumbs.

Lightly spray a baking dish with non stick spray, and place breasts in the dish. Cover with foil. Bake at 350 degrees for about 60 minutes, uncovering the dish for the last 10 minutes of cooking. Remove toothpick and serve.

Tuesday, June 30, 2009

Taco Dip


This is a recipe I learned from my favorite aunt, who makes it for every family function! Let me just say that this is always a huge hit. You will find that you have to start doubling the recipe just to keep people happy! It's perfect for making ahead of time (which is always important for big gatherings) and it's really quite addicting!!! This appetizer is delicious and crowd pleasing!

Ingredients
Source: My favorite Aunt

1 8 oz. block of cream cheese, softened ( you can use reduced fat)
1 16 oz. container sour cream (you can use light)
1 lb. ground beef
1 package of taco seasoning
1 small jar of taco sauce (whatever heat you want)
1 bag of Mexican shredded cheese
shredded lettuce
chopped tomatoes
tortilla chips

Directions
In a medium skillet, cook ground beef over medium high heat until cooked through and thoroughly crumbled. Add taco seasoning packet with the amount of water directed on the back of the package. Set aside to cool.

In a large bowl or in the bowl of your stand mixer, add sour cream and cream cheese. Blend together thoroughly (I find that using the whisk attachment on your Kitchen Aid mixer works the best).

Spread cream cheese/sour cream mixture on the bottom of a 13x9 baking dish or pan. Spread taco sauce over that, and the ground beef mixture over that, creating even layers. Top with shredded cheese, then lettuce then tomatoes. Serve with tortilla chips. Enjoy!

Wednesday, June 10, 2009

Roasted Vegetable Tian


After another great trip to the farmers market, I found myself with an abundance of beautiful fresh veggies to use! So when I saw this recipe on Annie's Eats I thought it would be perfect to try out!

This recipe was truly fabulous. What a great way to present roasted vegetables, and it came out so delicious too! I didn't use the exact ingredients in the recipe, but I feel like that is the great thing about it! You can just use the freshest ingredients you have on hand. This is one that I can see me making over and over again!

Mine didn't come out quite as "pretty" as Annie's, because I used veggies that varied greatly in size and shape. But the taste was there which was all that mattered!
Ingredients
Adapted from Annie's Eats
Originally from Ina Garten, Barefoot in Paris

Olive oil
Balsamic vinegar (I added this)
2 large yellow onions, cut in half and sliced (I used one very large onion)
2 garlic cloves, minced
1 lb. medium round potatoes, unpeeled (I chose not use potatoes in this since I was making a side of potatoes au gratin for dinner that night)
3/4 lb. zucchini (I used 2 medium zucchini which ended up being just a bit too much!)
1 1/4 lb. medium tomatoes (I used 2 large tomatoes)
1 medium Eggplant, sliced (I added this)
1 tsp. kosher salt
1/2 tsp. freshly ground black pepper
1 tbsp. fresh thyme leaves, plus extra sprigs (I omitted)
2 oz. Gruyere cheese, grated (I used Parmesan and a bit of shredded mozzarella)
5-6 fresh sage leaves, chopped (I added this)
Aprox. 1 tsp dried rosemary (I added this)

Directions
Preheat the oven to 375 degrees. Brush a 9×13″ baking dish with olive oil. Heat 2 tablespoons olive oil in a sauté pan, and cook the onions over medium heat until translucent, about 8-10 minutes. Add the garlic and cook for another minute. Spread the onion mixture on the bottom of the baking dish.

Slice the potatoes, zucchini, eggplant and tomatoes in 1/4-inch thick slices. Layer them alternately in the dish on top of the onions, fitting them tightly, making only one layer. Sprinkle with the salt, pepper, thyme leaves, and thyme sprigs (Or sage and rosemary, if using). Drizzle with 1 more tablespoon of olive oil (and balsamic vinegar, if using), if desired. Cover the dish with aluminum foil and bake for 35-40 minutes, until the potatoes are tender. Uncover the dish, remove the thyme sprigs, sprinkle the grated cheese on top , and bake for 30 minutes more, or until browned. Serve warm.

Friday, May 1, 2009

Mediterranean Turkey Burgers


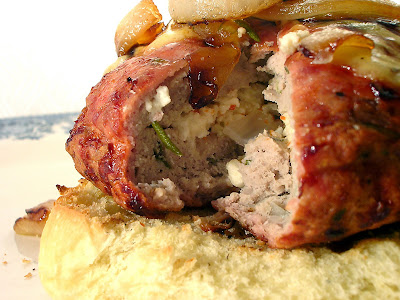
Now that the weather is half way decent up here in the north, my husband and I have been craving burgers on the grill. However, I'm not the kind of girl that can have a regular beef burger a lot...I get bored. So to switch it up I've been making different kinds of turkey burgers. Much healthier and you can really get creative! So when I saw these Mediterranean Turkey Burgers on Vintage Victuals, I was anxious to give them a try. Unfortunately, I didn't have any Greek Seasoning so I did a lot of subbing with some fresh herbs and added quite a few other things that happened to be in my kitchen but the result was really fantastic! I put a slice of gouda cheese on my burger for extra cheesiness (and because it's probably going to go bad soon), but to be honest it didn't add much because the burger itself was so flavorful. That being said, these burgers are loaded with flavor in every bite and totally hit the spot. They were the something different I crave, relatively healthy, and absolutely delicious. Overall, a great turkey burger!

Ingredients
Adapted from Vintage Victuals

1 lb. ground turkey breast
2 ounces feta cheese, cubed or crumbled (I used fat-free crumbled)
1/2 shallot, minced
2-3 cloves of garlic, minced
1/2 sprig fresh rosemary, minced
2-3 sage leaves, minced
1/2 onion, sliced
Salt
Pepper
pinch of sugar
1 tsp extra virgin olive oil
Juice of 1/2 lemon, very lightly juiced (About 1-2 tsp.)
2 hamburger buns

Directions
In a large bowl, combine turkey, shallot, garlic, rosemary, sage, salt, pepper and lemon juice until thoroughly combined. Form into 4 equal sized thin patties, and in the center of 2 patties sprinkle as much feta cheese as desired. Put remaining 2 patties over the patties with feta and completely seal edges. Grill burgers until cooked throughout. Meanwhile, in a small sauce pan add olive oil and onion slices. Sprinkle with sugar. Cook on medium heat for about 20 minutes until caramelized, stirring frequently. Server burgers on toasted buns and top with caramelized onions.

Wednesday, April 29, 2009

Provincial Chicken with Swiss


This was a great meal that is perfectly easy to throw together on a busy weeknight. Herbs de Provence is the star of this dish, bringing so much wonderful flavor to the chicken. Swiss cheese adds a smooth bite while the Panko breadcrumbs bring texture. All in all, this is a flavorful and easy meal that will appeal to most palates.

Ingredients
2 chicken breasts, pounded thin
1/2 cup AP flour
1 egg white
splash of skim milk
Aprox. 3/4 cup plain Panko breadcrumbs
aprox. 1-2 tsp Herbs de Provence
2 slices swiss cheese
salt
pepper
Directions
Preheat oven to 350 degrees and spray a baking dish with non stick spray. Lightly season chicken with salt and pepper. Using about 1/2 tsp. (or more) per chicken breast, rub herbs to provence into both sides of breasts and then dust with flour so the chicken is completely covered. In a small bowl, whisk together egg white and milk, then dredge chicken in the egg white mixture. Finally, coat chicken in Panko breadcrumbs so the chicken is completely coated. Place in baking dish. If desired, sprinkle a bit more herbs de provence over chicken. Cover dish with foil and bake for 45 minutes. Then, remove foil from dish, place 1 slice of Swiss Cheese over both breasts and bake for an additional 15 minutes, uncovered.

Friday, April 24, 2009

Beer and Cheddar Risotto


t

I have to admit that I've had the recipe bookmarked for ages now. I knew it would be something my husband would really like but I wasn't too sure about it. I really, really dislike beer, and this called for a whole bottle so I was honestly avoiding making it. But when I couldn't think of another side to make for my Cornish Game Hens, I decided to give this a whirl.

I was honestly very, very pleasantly surprised how this came out. The beer added flavor without being overwhelming. The cheddar made it wonderfully cheesy with a fantastic bite (I used very sharp cheddar!). This was probably the most flavorful risotto I've made to date, and all of the flavors, textures, etc. worked perfectly together. This was a fabulous recipe that I will most certainly be making again!

Ingredients
Adapted From Cooking This and That
Originally from FayeD on the What's Cooking board on the Nest

1/2 small onion, diced (I used 1 onion)
1-2 cloves garlic, minced
1 tablespoon butter
2+ tablespoons olive oil
2 cups Arborio rice
12 oz. bottle of beer (preferably not light beer) (I used Michelob Ultra which is light and it was totally fine!)
49.5 ounce can of chicken broth
5 ounces sharp cheddar cheese, shredded
1/3 cup mozzarella cheese, shredded
1/3 cup Parmesan cheese, shredded
1/4 teaspoon cayenne pepper (I omitted)

Directions

Pour chicken broth into medium saucepan. Keep warm over low heat.

Heat large saute pan over medium-low heat. Add butter and 2 tablespoons olive oil. Heat just until butter is melted. Add onion and saute for 3-5 minutes, until soft and translucent. Turn heat to medium-high and add garlic. Cook for 30 seconds to 1 minute, just until fragrant.

Add rice and saute for 2 minutes, stirring constantly until opaque, adding more olive oil as necessary to coat the rice.

Pour in beer, turn heat up to high until it starts to simmer.

Turn heat back to medium-low and add the chicken broth 1/2 cup at a time, stirring until liquid dissolves. You may not need to use all of the chicken broth - risotto should be creamy and just slightly al dente. This should take 30 minutes or more.

Remove from heat and stir in the cheeses and cayenne pepper.
 

blogger templates | Make Money Online