Sunday, February 13, 2011

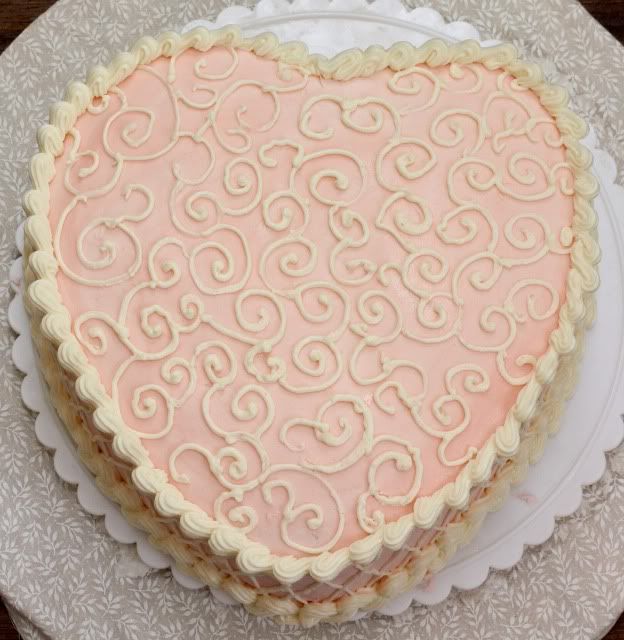
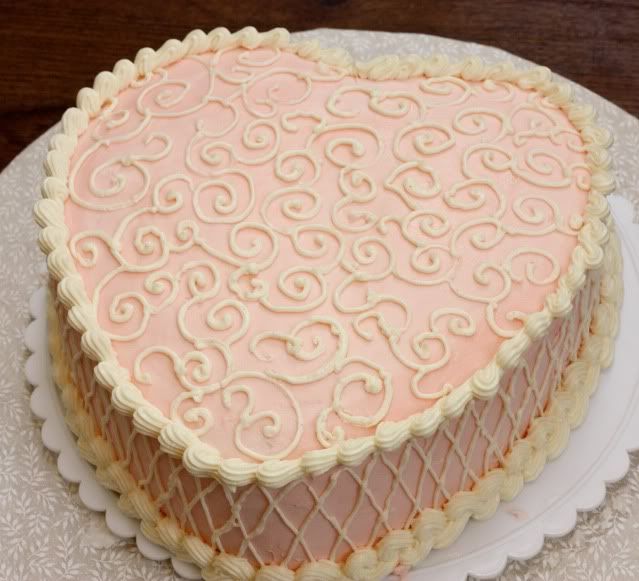
Valentine's Day Cake


It's been months since I've made a cake, so I decided to make one for Valentine's Day. I made a simple chocolate cake and filled it with whipped ganache and iced it in traditional vanilla butttercream. Can we say decadence?!

For the cake I used my favorite Hershey's Perfectly Chocolate Cake.

Whipped Ganache Cake Filling
Source: Martha Stewart

Ingredients
16 oz. semi sweet chocolate, chopped
2 1/2 cups heavy cream

Directions
*Note - I halved this recipe to fill one medium sized cake. It worked perfectly and was just enough to fill the cake with.

Place the semisweet chocolate in a large heat-proof bowl. Bring cream to a boil in heavy-bottom pan over medium-high heat; pour over the chocolate. Let sit for 10 minutes; use rubber spatula to stir until smooth.


Let chocolate mixture cool to room temperature, stirring occasionally. Place mixture in the bowl of an electric mixer fitted with a whisk attachment. Whip on medium speed until ganache holds its shape and is slightly lightened in color.


Easy Vanilla Buttercream
Source: Food Network

Ingredients

3 cups confectioners' sugar
1 cup butter
1 teaspoon vanilla extract
1 to 2 tablespoons whipping cream

Directions
*Note - I doubled this recipe which made a perfect amount to ice and decorate a medium cake.

In a standing mixer fitted with a whisk, mix together sugar and butter. Mix on low speed until well blended and then increase speed to medium and beat for another 3 minutes.

Add vanilla and cream and continue to beat on medium speed for 1 minute more, adding more cream if needed for spreading consistency.

Friday, February 11, 2011

Peanut Butter Swirl Brownies


I've had these brownies bookmarked for ages now, but have not made them because my husband doesn't like peanut butter and chocolate together (freak!). So since he was on a diet and I was craving a sweet, I pulled the recipe from the archives and I'm very glad I did! These were fantastic, I loved the peanut butter filling especially. The brownie was good, but was a bit cake like for me personally. Next time I'd omit an egg to make them a bit fudgier. But all in all, these were delicious and absolutely hit the spot!

Ingredients
Source: Martha Stewart

FOR THE BATTER

8 tablespoons (1 stick) unsalted butter, cut into small pieces, plus more for pan
2 ounces good-quality unsweetened chocolate, coarsely chopped
4 ounces good-quality semisweet chocolate, coarsely chopped
2/3 cup all-purpose flour
1/2 teaspoon baking powder
1/4 teaspoon salt
3/4 cup granulated sugar
3 large eggs
2 teaspoons pure vanilla extract

FOR THE FILLING

4 tablespoons unsalted butter, melted
1/2 cup confectioners' sugar
3/4 cup smooth peanut butter
1/4 teaspoon salt
1/2 teaspoon pure vanilla extract

Directions
  1. Preheat oven to 325 degrees. Butter an 8-inch square baking pan and line with parchment, allowing a 2-inch overhang. Butter lining (not overhang).
  2. Make batter: Put butter and chocolates in a heatproof medium bowl set over a pan of simmering water; stir until melted. Let cool slightly. Whisk together flour, baking powder, and salt in a bowl.
  3. Whisk granulated sugar into chocolate mixture. Add eggs, and whisk until mixture is smooth. Stir in vanilla. Add flour mixture; stir until well incorporated.
  4. Make filling: Stir together butter, confectioners' sugar, peanut butter, salt, and vanilla in a bowl until smooth.
  5. Pour one-third of batter into prepared pan; spread evenly with a rubber spatula. Drop dollops of peanut butter filling (about 1 tablespoon each) on top of batter, spacing about 1 inch apart. Drizzle remaining batter on top, and gently spread to fill pan. Drop dollops of remaining filling on top. Gently swirl peanut butter filling into batter with a butter knife, running the knife lengthwise and crosswise through layers.
  6. Bake until a cake tester inserted into brownies (avoid center and edges) comes out with a few crumbs but is not wet, about 45 minutes. Let cool slightly in pan, about 15 minutes. Lift out; let cool completely on a wire rack before cutting into squares. Brownies can be stored in an airtight container at room temperature up to 3 days.


Wednesday, February 9, 2011

Chocolate Cupcakes with Rapsberry Buttercream

One of my first pregnancy cravings was chocolate cake. Since I didn't have it in me to make an entire cake, I thought I'd do cupcakes and boy did they hit the spot! I used my favorite chocolate cake recipe and made a very simple buttercream to top them. I'd like to say I shared these, but I totally didn't. :)

Ingredients

Source for Cake- Hershey's
Source for Buttercream - Apple A Day

1 recipe chocolate cake, I used this one

20 TBSP (2 ½ sticks) unsalted butter, softened
2 ½ c. confectioners’ sugar, sifted
1/8 tsp. salt
1 TBSP raspbery liquer of 1 1/2 tsp. raspberry extract (I used the extract...obviously)
2 TBSP water, if necessary
gel food coloring, if desired


Directions

Make cupcakes as per recipe directions. Allow to cool completely before frosting.

For the Buttercream

1. In a stand mixer fitted with the whisk attachment, beat the butter at medium-high speed until smooth, about 20 seconds.

2. Add confectioners' sugar and salt. Beat at medium-low speed until most of the sugar is moistened, about 45 seconds. Scrape down the bowl and beat at medium speed until the mixture is fully combined, about 15 seconds.

3. Scrape bowl, add liquer or extract, and beat at medium speed until incorporated, about ten seconds. If using gel food color (I used a few drops of liquid food coloring) add at this time.

4. Increase the speed to medium-high and beat until light and fluffy, about four minutes, scraping down bowl once or twice. Add water to achieve desired consistency, if needed. Ice cupcakes as desired.

Monday, February 7, 2011

Ganache Filled Cookies

These cookies are a wonderful twist on a classic chocolate chip cookie. They take a bit longer to make than a normal chocolate chip cookie, but overall they are straightforward, easy to make and wonderfully delicious. A great concept and wonderful cookie, these are certainly a fun way to reinvent a classic.

Ingredients
Source: Sing for your Supper

1 batch chocolate chip cookie dough, without the chocolate chips (any recipe you want)
1/2 cup heavy cream
1 cup (approx. 6 oz.) chocolate chips
pinch of sugar
salt for sprinkling (I omitted)

Directions

Preheat oven to 350 degrees. Heat heavy cream and sugar in a small pan over medium heat until boiling; pour over the chocolate chips. Let sit for a few seconds then stir to combine. Chill for at least one hour.

Make the cookie dough according to desired recipe. Chill.

To assemble: using a small cookie scoop or a spoon, scoop out some dough (a small amount. My first batch I made the size of a normal cookie but after I baked it it got HUGE. So definitely make the pieces of dough on the small size) and liberally sprinkle your palm with flour- flatten the dough on the palm of your hand and place a small spoonful of ganache in the center. Cover with another piece of flattened dough and seal the edges (you’ll have a small disk), then gently roll into a ball. Place on a baking sheet lined with parchment paper. Sprinkle with sea salt. Place each cookie at least 2 inches apart on cookie sheet.
Bake for 12-15 minutes, or until cookies are golden brown. Makes aprox. 30 cookies.

Sunday, February 6, 2011

It's been 3 months...

It's been just about 3 months since I've posted anything. Huh. I wonder what could have prevented me from cooking/blogging for 3 months....

I'll give you a hint.

And no, those are not two pictures of the same baby.

I'm pregnant with twins!!!! A little over 17 weeks to be exact, and the babies are doing great!

First trimester morning sickness was a nightmare. Not to be too graphic, but I was throwing up everything I put down and lost around 10 lbs. I tried to continue to blog but it was too hard. I didn't even start cooking again until just recently.

And while morning "nausea" is still lingering, I'm feeling better by the day and am getting back in the kitchen! I certainly can't promise that I'll be posting with any sort of frequency, but I'm doing my best and definitely want to continue with my blog.

Thanks for hanging in there with me, and again my apologies for my prolonged absence!

Monday, November 1, 2010

Butternut Squash Pierogi


I had the idea to make butternut squash pierogi while driving to work. It's funny, that's where a lot of my ideas come from. I just hadn't made pierogi in a while and wanted to do something different. Then I remembered I had 15 butternut squash in my garage that were freshly picked from the garden, so I figured butternut squash pierogi would work out pretty well!

I have to say, I absolutely loved these. They are full of fresh, autumnal flavors. The sage comes through delightfully, but the delicate butternut squash is the star. Sauté these in some butter and onions, and the outside of the pierogi becomes perfectly crisp which lends itself to the tender center perfectly.
For the Pierogi Dough

Ingredients
Source: Martha Stewart

1 large egg
2 tablespoons sour cream
1 cup milk
1 cup water
4 1/2 to 5 cups all-purpose flour, plus more for dusting

Directions

Make the dough: In a medium bowl, whisk egg. Add sour cream, and whisk until smooth. Add milk and 1 cup water, and whisk until combined. Slowly add about 3 cups flour, and stir with a wooden spoon to combine.


Turn dough out onto a well-floured surface and work in about 1 cup flour as you knead. Use a plastic scraper to lift dough as it will stick to the counter before flour is worked in. Continue kneading for 8 to 10 minutes, working in another 1/2 cup flour. The dough should be elastic in texture and no longer sticky. Be careful not to add too much flour, as this will toughen dough. Place dough in a lightly floured bowl and cover with plastic wrap and let rest while you prepare filling.

Butternut Squash Filling
(Note - this will make about 30 or so pierogi, which is about half of the pierogi from the recipe above. I made 1/2 butternut squash and 1/2 potato, but if you want to make all butternut squash, I'd recommend doubling this recipe)

Ingredients
1 medium to large Butternut squash
4-6 large, fresh sage leaves
1/2 - 1 tsp cinnamon
pinch of ground ginger
1/8 - 1/4 tsp freshly grated nutmeg
salt and freshly ground black pepper to taste

Directions

Preheat oven to 400 degrees and line a baking sheet with parchment paper. Cut the butternut squash in half lengthwise and scoop out the seeds and discard. Place on the prepared baking sheet, cut side down, and bake until very soft with pierced with he top of a knife, about 35-45 minutes. Let cool to the touch. Peel the squash and place the flesh into a medium bowl. Add remaining ingredients to the bowl, and stir well until very smooth.

To assemble pierogi:
On a floured surface, roll out dough to about 1/8 inch thick. Using a glass or cookie cutter measuring 2 1/2 inches in diameter, cut out as many circles as possible. Gather dough scraps together, rolling them out again, and continue cutting.

Scoop a teaspoon of filling and place a ball in the center of each dough circle.
Moisten the edges with water, fold over, and press together with a fork to seal. Repeat procedure with the remaining dough.

You can now freeze your Pierogi if you choose to do so. I put them on wax paper on a baking sheet and freeze for about 20 minutes or so. Then I put them in a larger air-tight container and layer them between wax paper. They freeze very well.

To cook pierogi (frozen or not) Bring a large pot of lightly salted water to a boil. Add perogies and cook for 3 to 5 minutes or until pierogi float to the top. Remove with a slotted spoon. In a separate pan, melt about 1/2 stick of butter. Add about 1/2-1 cup of chopped onions and cook until translucent. Add boiled pierogi to pan and fry until golden brown on each side.

Friday, October 29, 2010

Candy "Eyeballs"


It's been far too long since I made peanut butter balls (I think the last time I made them was Christmas! The very idea sends shivers down my spine!) So when I saw the idea for peanut butter eyeballs on Allrecipes.com I was so excited to break out the jar of peanut butter and make little eyeballs for work. I'm actually not very "into" Halloween to be honest. The only thing that appeals to me are the cute treats that I get to make. But besides that, my husband and I really don't do anything to celebrate. Not to mention we live in a very rural area and haven't gotten a trick or treater, well, ever.

But everyone at work certainly appreciates my treats so I knew they'd get a kick out of these little eye balls. And not only did I make Peanut butter eyeballs, but cake eyeballs as well! These went over so well. Not only did they taste great, everyone thought they were hysterical! These would be so great for a kid OR Adult Halloween party!

Happy Halloween!

Oh yeah - and since I probably won't be posting on Sunday, happy 2 year bloggiversary to Le Petit Pierogi! Thanks to everyone who still reads, despite the fact that I don't get to post as often as I'd like to anymore!!!


Peanut Butter Eyeballs

Ingredients
Adapted from Allrecipes.com

1 cup creamy peanut butter
1 stick unsalted butter
1/2 tsp vanilla extract
1/2 - 1 lb confectioners sugar
White candy melts
Aprox 1 tbsp. shortening

Directions
Melt butter in a medium saucepan over medium heat. Add peanut butter and stir until mixture is very smooth. Add vanilla. Slowly stir in confectioners sugar until desired consistancy is reached. When mixture is cooled, form into balls on a parchment lined cookie sheet and place in refrigerator at least 30 minutes. Meanwhile over a double boiler, melt white chocolate candy melts with a small dollop of shortening and stir until white chocolate is melted. Dip peanut butter balls in chocolate and place back on cookie sheet. To make the "iris" and "pupil," add some white chocolate into small, separate bowls. Add a bit of gel food coloring (in desired color) to the white chocolate and stir to combine. With a small paintbrush, glob on colored white chocolate to complete the "eye!"

Cake Eyeballs

Ingredients
Cakeball Recipe from Bakerella

1 box cake mix
1 can frosting
white chocolate candy melts
1 tbsp shortening

Directions
Cook cake according to package directions in a 13 x 9 pan. After the cake is done baking, allow it to cool completely. Then crumble it into a large bowl (I use my kitchen aid stand mixer - it makes combining the cake and frosting SO much easier). Add the entire can of frosting and stir by hand, or using the paddle attachment of you mixer. Form into balls on a parchment lined baking sheet and cool in the refrigerator. Meanwhile over a double boiler, melt white chocolate candy melts with a small dollop of shortening and stir until white chocolate is melted. Dip peanut butter balls in chocolate and place back on cookie sheet. To make the "iris" and "pupil," add some white chocolate into small, separate bowls. Add a bit of gel food coloring (in desired color) to the white chocolate and stir to combine. With a small paintbrush, glob on colored white chocolate to complete the "eye!"

Monday, October 25, 2010

Spooky Sugar Cookies


I made these cute little cookies in honor of Halloween. They are simply sugar cookies (my favorite recipe) cut with a round biscuit cutter, and iced in royal icing. Making black icing is a bit tough (because you have to use so much coloring) so a tip I learned is to first 'dye' your icing with cocoa powder. Then add in as much black gel food color as you need.

Happy Halloween!

Friday, October 8, 2010

Grandma's Molasses Cookies


First let me preface this by saying this is not my grandma's recipe. I have no idea who's grandma's recipe this is to be honest. I found this recipe in a local church cookbook that my mom gave me, and all this recipe said was "Grandma's Molasses Cookies." This is just a simple cookbook, so there were no photos or descriptions. Just a compilation of some good ole' tried and true recipes.

I have to admit, halfway during the mixing process I had serious trepidations about the recipe. When you add the water to the batter, everything just starts looking weird. The shortening separates from everything else and it just looks, well, not normal. But I kept on with the recipe because I was sure that grandma wouldn't steer me wrong.

And I was right! These cookies came out great! They were wonderfully spiced, big, thick, soft cookies. My husband and I really enjoyed these - and they'd be great on a Christmas cookie tray!

Ingredients
Source: Local Church Cookbook

1 cup sugar
1 cup shortening
1 egg
1 cup molasses
1 cup cold water
3 tsp. baking soda
1 tsp. cinnamon
1 tsp. ground cloves
1 tsp. ginger
1 tsp. salt
5 cups flour

Directions
Cream sugar and shortening together. Add eggs, molasses, baking soda and water (this is when the mixture got weird). Mix together. Add cinnamon, ginger, cloves, salt and flour and mix. Drop by spoonfuls onto cookie sheet and sprinkle with sugar. Bake at 350 degrees for 12 minutes.

Thursday, October 7, 2010

Chicken Noodle Casserole


I decided to make this for dinner last week because my husband had a cold. You know, the change of weather sniffles, sneezing, sore throat, etc. Don't worry, he's doing better now. Maybe it was this casserole that helped him out!

This was a really comforting meal that tasted like chicken noodle soup in a casserole! It was easy to make with ingredients that you probably have on hand. Although my husband said he couldn't really taste it (poor thing!) he said he liked the texture. But I'll vouch on the taste - it was great!

Ingredients
Source: www.Allrecipes.com

2/3 cup chopped onion
1 garlic clove, minced
1 tablespoon olive or canola oil
1 1/2 pounds boneless skinless chicken breasts, cut into 3/4-inch cubes
1 (14.5 ounce) can chicken broth
1 1/2 cups chopped carrots
3 celery ribs, chopped
1/2 teaspoon dried savory
3 tablespoons butter or stick margarine
3 tablespoons all-purpose flour
3/4 teaspoon salt
1/8 teaspoon white pepper
1 1/2 cups 2% milk
1 1/4 cups shredded reduced-fat Cheddar cheese
8 ounces wide egg noodles, cooked and drained
1/2 sleeve crushed Ritz crackers (I added this)

Directions

In a large nonstick skillet, saute onion and garlic in oil until tender. Add chicken; cook and stir until no longer pink. (I cooked the chicken first, then added the onions and garlic). Add the broth, carrots, celery and savory. Bring to a boil. Reduce heat; cover and simmer for 10-15 minutes or until vegetables are tender.


Meanwhile, in a saucepan, melt butter. Stir in the flour, salt and pepper until smooth. Gradually add milk. Bring to a boil; cook and stir for 2 minutes or until thickened. Remove from the heat; stir in cheese until melted. Pour over chicken mixture. Add noodles; mix well.


Transfer to a 3-qt. baking dish coated with nonstick cooking spray. Sprinkle crushed crackers over entire casserole. Bake, uncovered, at 350 degrees F for 15-20 minutes or until bubbly.

Wednesday, October 6, 2010

Caramel Apples


Back in high school my two worst subjects were math and science. But today we're going to talk about science. Not like I hated it (math was far worse), but all those symbols and equations and yeah....it was just too complicated for me.

But as I age, I'm finding that I love making things that are, well, science-ey (Don't worry, I was an English major in college so I'm allowed to make up words). I love when one thing transforms into another, I LOVE my candy thermometer, and I love making big sticky messes. And since I have an influx of apples from the orchard, I decided to make caramel apples for my coworkers (and myself. And my husband.)

These came out SO cute! I loved making the caramel and decorating the sweet little apples. Some toppings I did were: Chocolate, Chocolate with Peanuts, Toffee bits, Halloween Sprinkles, and pecans (my personal favorite is the chocolate with peanuts)! These are impressive, adorable and a huge hit with kids and adults alike!!!

Ingredients
Source: Martha Stewart

1 cup granulated sugar
1 1/4 cups heavy cream
1/2 cup light corn syrup
2 tablespoons unsalted butter
1 teaspoon vanilla extract
10 to 12 small apples, stems removed (I only got 9-10 out of the recipe)
Vegetable-oil cooking spray
Round wooden skewers

Directions


Heat sugar, cream, corn syrup, and butter in a saucepan over medium-high heat, stirring until butter has melted. Clip a candy thermometer to side of pan, and continue to cook until mixture reaches 240 degrees. Remove from heat, and stir in vanilla. Let cool for 5 minutes.

Line a baking sheet with parchment paper, and coat with cooking spray. Insert a skewer into stem end of each apple. Dip apples in caramel, and place on sheet. Let stand until set, at least 1 hour. Apples can be stored airtight for up to 1 day.


Tuesday, October 5, 2010

Veal Patties with Chives


The other day when I was at the store and ground veal was on sale, so I picked up a pound. Then I got home and I realized I had no idea what to make with it.

So I searched online a bit and found this recipe which I thought looked pretty interesting. So I decided to give it a whirl, with some changes of course (aka did NOT use mushrooms)!

My husband and I both had the same word to describe this meal - different. Not BAD different- just different! We both really enjoyed it very much and it was a great diversion from the normal chicken or beef dinner.
Ingredients
Adapted from Epicurious.com, originally from Gourmet, February 2006

2 slices firm white sandwich bread, coarsely crumbled
1/4 cup heavy cream
1 large egg, lightly beaten
3/4 teaspoon salt
1/4 teaspoon black pepper
2 1/2 tablespoons finely chopped fresh chives
1 1/4 lb ground veal
1/2 cup fine dry bread crumbs - not seasoned (I used Panko Breadcrumbs)
2 tablespoons vegetable oil
1/2 stick (1/4 cup) unsalted butter
1/2 lb cremini mushrooms, trimmed and cut into sixths (I omitted)

Directions

Put oven rack in middle position and preheat oven to 200°F.

Soak bread in cream in a large bowl 5 minutes. Stir in egg, salt, pepper, and 1 tablespoon chives until blended well. Add veal and mix with your hands until combined well. Form veal mixture into 4 (4-inch) patties. Spread dry bread crumbs on a sheet of wax paper and coat patties all over.

Heat oil with 2 tablespoons butter in a 12-inch nonstick skillet over moderately high heat until foam subsides, then cook patties, carefully turning over once, until golden brown, firm to the touch, and thermometer inserted into center of each registers 148°F, 8 to 10 minutes total. Transfer patties to an ovenproof platter and keep warm, covered with foil, in oven. Do not clean skillet.

Heat remaining 2 tablespoons butter in skillet over moderately high heat until foam subsides, then sauté mushrooms (I actually used onions), stirring occasionally, until browned and tender, 3 to 5 minutes. Stir in remaining 1 1/2 tablespoons chives and salt and pepper to taste. (I also added 2-3 tablespoons of cream to thicken it up a bit.)

Serve veal patties topped with mushrooms (or onions!)

Monday, October 4, 2010

Minestrone Soup


Since the weather started cooling off, I've been in the mood for SOUP. Every lunch and dinner, all I want is soup, soup and more soup.

Minestrone has always been a favorite of mine, but I've never made it! I finally decided it was high time that I did.

So on a lazy Sunday afternoon, I made a batch of this for work day lunches. It is SO delicious and I know that it freezes beautifully. Make a few batches for your fridge, and then put a few more in your freezer. To thaw from your freezer, just put on your countertop overnight. In the morning, just put it in your refrigerator to store until you are ready to heat it up. This soup is hearty, flavorful and just so comforting.

So get yourself a slice of fresh Italian bread and a bowl of this hot soup and watch the bright red-orange leaves float to the ground outside your window.

Ingredients

Adapted from Epicurious.com, originally from Gourmet Magazine, March 1993

1/2 pound (about 1 1/4 cups) dried white beans such as Great Northern, picked over and rinsed 1/2 teaspoon salt
1/4 pound pancetta (Italian cured pork belly, available at Italian markets and specialty foods shops) or sliced lean bacon, chopped (I used bacon)
1/3 cup olive oil
1 onion, chopped
1 large carrot, cut into 1/2-inch dice
1 rib of celery, cut into 1/2-inch dice
3 garlic cloves, chopped fine
2 zucchini, scrubbed and cut into 1/2-inch dice (I used one very large zucchini)
1/4 pound green beans, trimmed and cut into 1/2-inch pieces
1/2 pound boiling potatoes
4 cups shredded green cabbage (preferably Savoy) (I omitted)
1/2 pound kale, rinsed, drained, stems discarded, and the leaves chopped (about 6 cups)
a 28-ounce can tomatoes, chopped coarse and drained well
4 1/2 cups chicken broth (preferably low-salt)
2-3 springs rosemary, chopped (I added this)
2-3 springs thyme, chopped (I added this)

Directions

In a large bowl let the white beans soak in enough water to cover them by 2 inches overnight or quick-soak them. Drain the white beans, in a saucepan combine them with enough water to cover them by 2 inches, and simmer them, uncovered, adding more water if necessary to keep them barely covered, for 45 minutes to 1 hour, or until they are tender. Add the salt and simmer the white beans for 5 minutes more. Remove the pan from the heat and let the white beans stand, uncovered.

In a heavy kettle cook the pancetta in the oil over moderate heat, stirring, until it is crisp and pale golden, add the onion, and cook the mixture, stirring, until the onion is softened. Add the carrots, the celery, and the garlic and cook the mixture, stirring, for 4 minutes. Add the zucchini, the green beans, and the potatoes, peeled and cut into 3/4-inch dice, and cook the mixture, stirring, for 4 minutes. Add the cabbage, kale, rosemary and thyme and cook the mixture, stirring, until the cabbage is wilted. Add the tomatoes and the broth and simmer the soup, covered, for 1 hour.

Drain the white beans, reserving the liquid, in a blender or food processor purée half of them with 1 cup of the reserved liquid, and stir the purée and the remaining white beans into the soup. Simmer the soup, uncovered, for 15 minutes, thin it if desired with some of the remaining reserve liquid, and season it with salt and pepper. The soup may be made 3 days in advance and kept covered and chilled, or frozen. Reheat the soup, thinning it with water as desired.

Friday, October 1, 2010

Caramel Corn


When I first told my husband I was making this he gave me a weird look. I asked him if he liked caramel corn and he replied "not really." I gave him a surprised look and asked why, if he like caramel, and popcorn, he didn't like caramel corn? And he just shrugged.

Well, never mind him, I thought it would be fun to make.

After it was finished, I made him try a piece. Then he asked if he could have another. Then he asked if he could have a bowl. Success! My husband is now a caramel corn convert.

I do have to warn you though - this stuff is SERIOUSLY addicting. You simply cannot have just one piece. I daresay it's worse than potato chips. Something about the sweet salty crunch just makes you want to have it more and more (and more). Enjoy!

Ingredients

Source: Christie's Corner

1 cup popcorn unpopped (makes enough to fill a Dutch over or about 6 quarts)
1 cup butter
1/2 cup light corn syrup
2 cups brown sugar (packed)
1 tsp kosher salt
1/2 tsp baking soda
1 tsp vanilla

Directions

Preheat oven to 250F.

Pop popcorn using your preferred method (I just popped it with a little oil in my dutch oven over medium heat). Place popped corn in a very large bowl. If you don’t have a big enough bowl, use two bowls. You will need lots of room to toss the corn when coating it.

In a saucepan over medium heat, melt the butter. Stir in the corn syrup, brown sugar and salt. Increase the heat to medium-high and bring the sugar mixture to a boil, stirring constantly. Boil for 5 minutes without stirring.

Remove from the heat and stir in the baking soda and vanilla. The mixture will foam and become frothy.

Pour the caramel sauce over the popped corn and toss to coat thoroughly. Don’t worry about clumps as the caramel will turn much more spreadable while cooking and the coating can be evened out.

Spread the popcorn evenly onto 2 large cookie or baking sheets lined with foil and sprayed with non stick spray. Bake for 40 to 50 minutes, tossing every 10-20 minutes or so.

This makes for a lovely gift bag for Halloween parties, Office parties, or even for your trick - or - treaters. Simply put in a cellophane bags and add a bit of candy corn and some M & M's. Everyone will love this sweet little treat!


Thursday, September 30, 2010

Italian Bread for the bread maker


This is a bread recipe that you make in your breadmaker, so it's super easy. I made this to go with lasagna on a lazy Sunday afternoon, and by using the breadmaker, it's a perfect recipe to just leave alone so you can do other things (like make your lasagna).

I did have to make a few changes to the original recipe though. Not in the ingredient list, but in the process. I did have one issue that I think affected the texture of the bread, but not the taste. I had made the dough, got the loaves on a sheet to rise, got a BEAUTIFUL rise out of both loaves, and then I put the eggwash over them. Big Mistake. The loaves instantly fell and I couldn't get them to rise back up. I baked them anyway, and like I said - the taste was good but I feel like the texture would have been SO much better had I not done the egg wash - or if I had done the egg wash before the 2nd rise.

But overall this is a very quick and easy recipe - and a great excuse to bust out your breadmaker!

Ingredients
Adapted from Allrecipes.com

4 cups unbleached all-purpose flour (I used bread flour)
1 tablespoon light brown sugar
1 1/3 cups warm water (110 degrees F/45 degrees C)
1 1/2 teaspoons salt
1 1/2 teaspoons olive oil
1 (.25 ounce) package active dry yeast (2 1/4 tsp)
1 egg
1 tablespoon water
2 tablespoons cornmeal

Directions

Place flour, brown sugar, warm water, salt, olive oil and yeast in the pan of the bread machine in the order recommended by the manufacturer. Select dough cycle; press Start.


Deflate the dough and turn it out onto a lightly floured surface. Form dough into two loaves. Place the loaves seam side down on a large cookie sheet lined with parchment and generously sprinkled with cornmeal. Cover the loaves with a damp cloth and let rise, until doubled in volume about 40 minutes. Meanwhile, preheat oven to 375 degrees F (190 degrees C).


In a small bowl, beat together egg and 1 tablespoon water. Brush the risen loaves with egg mixture. Make a single long, quick cut down the center of the loaves with a sharp knife.
(I would omit these steps next time based on this making my loaves deflating).

Bake in preheated oven for 30 to 35 minutes, or until loaves sound hollow when tapped on the bottom.

Wednesday, September 29, 2010

Beef Stroganoff


I decided to make this last week when my husband and I realized that we were getting rather sick of chicken. I knew this would be something my husband would like, so I thought I'd give it a try. I knew this wouldn't be the most elegant of meals, but I was hoping it would have some flavor at least!

I chose this particular recipe because it didn't have a can of cream of who knows what soup in it, which I'm personally not a huge fan of. Overall this was a great recipe. Yeah, it was perhaps one of the ugliest meals I've made, but it was good! And it was a definite husband pleaser!!! Homey, comforting, and hearty - this is a great fall/winter meal.

Ingredients

Adapted from Allrecipes.com

1 pound ground beef
1/2 cup chopped onion
1 (4.5 ounce) can mushrooms, drained (I omitted)
1/2 teaspoon garlic powder
1/2 teaspoon mustard powder
1/2 cup sour cream
1/2 cup mayonnaise
1/2 cup beef broth
2 tsp. Worcestershire sauce (I added this)
1 (8 ounce) package wide egg noodles
salt
pepper

Directions

Break up ground meat into a large skillet and brown until cooked through. Drain off excess fat. Add onion, mushrooms, garlic powder, and mustard powder. Cook and stir over medium heat until the onion is tender.


In a small bowl, combine sour cream, mayonnaise, Worcestershire sauce and beef broth. Stir into beef mixture, and cook over low heat for 10 to 15 minutes. Do not stir too much.
Season with salt and pepper to taste.

Meanwhile, cook pasta in a large pot of boiling water until done. Drain. Serve sauce over
hot noodles.

Tuesday, September 28, 2010

Apple Bread


It's Apple Season!!!! yay! This is by FAR my favorite time of year...crisp air, cornstalks, apple cider, pumpkins, red leaves...ahhh. I just love it.

Last weekend the husband and I went apple picking at the local orchard, and came home with three huge bags of apples, so of course I had to find a great new recipe to use with them! My husband has been requesting a nice bread, so I decided on apple bread.

And I'm very glad I did. This recipe went above and beyond my expectations. Seriously. It's spicy, sweet, moist, soft...it's just perfectly amazing and am already planning on making a second batch. I made a bunch of mini-loaves and individually wrapped them. I have to say, I think these would be perfect favors for any autumn party, shower, or wedding. I urge you to make this bread with your freshly picked apples - you'll be so glad you did!

Ingredients
Adapted from Allrecipes.com

3 Cups All Purpose Flour
2 Tsp. Cinnamon
1/2 Tsp. Allspice (I added this)
1 Tsp. Baking Soda
1/2 Tsp. Baking Powder
1/2 Tsp. Salt
1/2 Cup Vegetable Oil
1 Cup White Sugar
1 Cup Brown Sugar, packed (I added this)
2 Eggs, Beaten
1/2 Tsp. Vanilla
2 cups apples, peeled, cored and coarsely chopped (I used 2 Cortland Apples)
1 cup broken walnuts (I omitted)
2-3 tbsp apple cider (optional)


Directions
In bowl, combine flour, cinnamon, allspice, baking soda, baking powder and salt; set aside. In large mixing bowl, place oil, sugar, eggs, vanilla and apples. Stir into flour mixture. Add walnuts and mix (if using). Here, my batter ended up being quite dry so I added in a few tablespoons of apple cider, but I suppose if your batter is at the right consistency, you could leave it out. Divide mixture between two greased 8-in. x 4-in. bread pans (I used mini loaf pans). Bake at 350 degrees F for 40-45 minutes (mine were done in 25-30 minutes because I used the mini pans) or until bread test done. Cool for 10 minutes on wire rack before removing from pan.

Monday, September 27, 2010

Chutney Chicken


First of all, let me just say I had no idea what to call this....but it has mango chutney in it so chutney chicken it is.

Actually, the reason I made this is because my aunt gave me a beautiful little jar of mango chutney. (I went on their website to scope out other products, but apparently they only ship to the UK! What a shame! There are so many things I'd love to try. But if you are in the UK, here's the website... Mrs. Bridges...and just know that I'm jealous!) Anyways, she won it at a bridal shower and told me that I would appreciate it more then her, so being the awesome aunt that she is, gave it to me. But truth be told, I had no idea what to do with it. I'm not familiar with chutney at all. I looked at things online that said it was good with cream cheese and in curry's. I have no idea what a curry even is (seriously) but I decided to go with the cream cheese thing.

It actually worked out really well! I just added a little of this and that, and it turned out deliciously! This could be made for one or two people, depending on how hungry you are! I just made it for myself, but definitely didn't finish it. But if you are feeding it to someone extra hungry, it's a very easy recipe to double.

Ingredients

1 boneless skinless chicken breast, cut into 1/2" pieces
1/4 of a yellow onion, chopped
2 garlic cloves, diced
1/2 cup chicken stock
3 oz. cream cheese
2 tbsp. mango chutney
2-3 fresh basil leaves, chopped
salt & freshly ground pepper

Directions
In a medium skillet (coated with non stick spray) over medium-high heat, add chicken and season with salt and pepper. Keep the chicken moving until all the chicken pieces are light golden brown and cooked all the way through. Add onions and cook another 3-4 minutes until onions are softened. Finally, add garlic and cook for another minute or two, being careful not to burn the garlic. Next add the chicken stock, basil leaves, mango chutney and cream cheese. Stir until cream cheese is melted and incorporated into the sauce. Serve hot over white rice.

Monday, September 13, 2010

Goat Cheese Stuffed Chicken with Cranberry Compote


I am personally a big fan of cranberries and often get annoyed that they're treated as a one-holiday food. The other day I was particularly in the mood for them, and thought they'd be good on chicken.

I stuffed my chicken with goat cheese for some added flavor and depth, then topped the whole thing with a quick and easy cranberry compote that I make every Thanksgiving.

The result was a deliciously moist and flavorful chicken that paired so nicely with the cranberry compote. I served it with white rice which worked wonderfully. This is a perfect dish for fall especially!

Ingredients
Cranberry Compote adapted from Emeril Lagasse

2 boneless, skinless chicken breasts pounded thin
Aprox. 2-4 tbsp goat cheese
1/2 cup frozen or fresh cranberries
1/2 cup water
1/2 tsp. cinnamon
1/2 tsp. good vanilla extract
2+ tsp. honey
1 tbsp. cornstarch
3 tbsp. milk
aprox. 1/2 tsp. lemon zest

Directions

Preheat oven to 350 degrees and grease a baking dish with non stick spray. On the bottom of both chicken breasts, spread a liberal amount of goat cheese and "roll" chicken up and secure with toothpicks. Place in baking dish and cover with foil. Bake for 1 hour, removing foil after 45 minutes.

While the chicken is cooking, make the cranberry compote. In a medium saucepan, add cranberries, water, cinnamon, vanilla, zest and honey. Stir to combine. On medium heat, bring to a gentle boil and continue to cook until the cranberries have "popped" and the mixture thickens. Meanwhile in a small bowl, whisk together milk and cornstarch and add it to thickened cranberry mixture. Taste everything and make sure it's sweetened to your liking (if not, add more honey).

Pour on top of cooked chicken and serve hot.


Tuesday, August 17, 2010

Zucchini Stew


In the summer when I have zucchini completely overtaking my garden, this is a recipe I make quite often. It's simple, easy and adaptable. Chances are, you'll have everything you need for it right in your pantry. It's also vegan which I find to be a nice chance of pace during the week. I usually serve it over white rice or pasta.

Ingredients

1 medium zucchini, chopped
1 28 oz. can of diced or petit diced tomatoes
1/2 medium onion, diced
3 garlic cloves, minced
1 handful fresh basil, roughly chopped
1/4 - 1/2 cup chicken stock (optional)
salt
pepper
freshly grated Parmesan cheese

Directions

In a medium saucepan over medium heat, add zucchini, tomatoes, onion, garlic, basil and salt & pepper to taste. Simmer for aprox. 30 minutes, or until zucchini is tender. If mixture becomes too thick, add chicken stock (you could even just add water or vegetable stock if you want to keep this completely vegan) and thin the sauce to your preference. Check again for seasoning and add more salt and/or pepper if need be.

Once zucchini is tender, serve hot over a bed of pasta or rice. Top with freshly grated Parmesan cheese. Also makes great left overs!
 

blogger templates | Make Money Online